|
To help find the best way to watch this classic, let me know: What do you currently subscribe to? What device are you planning to watch the movie on? Share public link
"Dual Audio" refers to a video file container (usually an MKV or MP4 file) that embeds multiple audio tracks simultaneously. This allows the viewer to toggle seamlessly between the original English audio and the Hindi dubbed audio using a media player like VLC or MX Player. It provides the ultimate flexibility, catering to bilingual households or viewers who want to cross-reference the localized script with the original performances. Why the 480p Resolution Format Remains King
While searching for 480p files is common, the best and safest way to experience the movie is through authorized streaming platforms.
Another standout moment involves Nora, a grieving mother, whose hair gets caught in the prosthetic limbs of a fellow elevator passenger. As she panics, the elevator doors malfunction, trapping her head outside the moving cabin. The sequence maximizes claustrophobia and the inherent fear of mechanical failure. The Phenomenon of "Dual Audio Hindi 480p" Searches final destination 2 2003 dual audio hindi 480
Final Destination 2 was filmed in Vancouver and Okanagan Lake. The film is known for its innovative use of sound and visual effects to create suspense. The film's music was composed by Shirley Walker. The film's release in India includes versions with Hindi audio, available in formats like DVD and VCD. The film's legacy includes its iconic wood log truck scene and the way deaths happen, which may frighten viewers and make them think about what if this happens in reality.
The dual audio Hindi 480p version of "Final Destination 2" is available on various online platforms, including:
This comprehensive article explores the cultural impact of Final Destination 2 , the enduring demand for Dual Audio (Hindi-English) releases, and the technical appeal of the highly optimized 480p resolution format for modern viewers. The Legacy of Final Destination 2 (2003) To help find the best way to watch
, which feature 5.1 Dolby Surround Sound for the Hindi track. 480p Quality:
Hollywood horror films possess a massive, loyal fan base across India and neighboring regions. While many viewers appreciate the original English dialogue to experience the actors' authentic performances, others prefer the immediate accessibility of a Hindi dub.
If you are watching the dual audio Hindi 480p version as a marathon, the correct order is: Final Destination (2000) → Final Destination 2 (2003) → Final Destination 3 (2006). This allows the viewer to toggle seamlessly between
However, cheating Death comes with a steep price. Soon after the accident, the survivors begin dying one by one in freak accidents. Kimberly tracks down Clear Rivers (Ali Larter), the sole institutionalized survivor of Flight 180, to understand the rules of Death’s design. Together, they discover that to break the cycle, they must create "new life"—leading to a desperate race against time to outsmart a supernatural blueprint that refuses to be altered. Why the Opening Pileup is Legendary
The mention of is also important. While far from high definition by today's standards, 480p file sizes are significantly smaller, typically ranging from 300MB to 700MB. This makes them ideal for users with limited internet bandwidth or for those who prefer to download and store movies on their mobile devices without filling up storage.
The opening highway sequence is widely considered one of the greatest disaster scenes in cinema history. To this day, drivers worldwide refuse to drive behind logging trucks because of this specific movie.
소스 | 설명 | 비고 |
CodeMirror | License: MIT | 일부 적용 |
| Eco Library | 아티클을참고하세요. | 배포 버전 사용 |
파일 업로드/다운로드 | 아티클을참고하세요. | 배포 버전 수정 적용 |
컬러 피커 | 아티클을참고하세요. | 배포 버전 수정 적용 |
|
속성명 | 하위 속성명 | 타입 | 설명 |
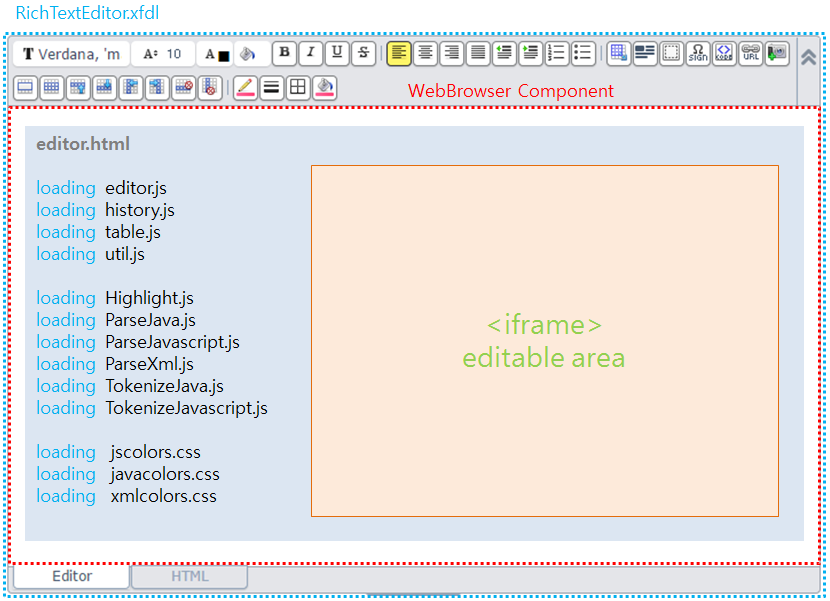
editor | url | string | editor.html 의 경로를 지정합니다. |
showToolbar | boolean | 툴바 영역을 보일지 여부를 지정합니다. | |
toolbarButtons | array | 툴바에 사용할 기능을 지정합니다. 지원하는 툴바 기능은 하단을 참고하세요. | |
allowResize | boolean | 에디터 영역의 리사이즈 허용 여부를 지정합니다. | |
showEditMode | boolean | HTML 편집모드을 보일지 여부를 지정합니다. | |
loadCallback | function | 에디터의 초기화가 완료된 후 호출되는 callback 함수를 지정합니다. | |
resizeCallback | function | 에디터의 사이즈가 변경될 때 호출되는 callback 함수를 지정합니다. | |
contentMinHeight | number | 에디터 본문 영역의 최소 높이를 지정합니다. 리사이즈 시 최소 크기보다 작아지지 않습니다. | |
contentMaxHeight | number | 에디터 본문 영역의 최대 높이를 지정합니다. 리사이즈 시 최대 크기보다 커지지 않습니다. | |
| contentHeight | number | 에디터 본문 영역의 초기 높이를 지정합니다. | |
| contentMinWidth | number | 에디터 본문 영역의 최소 너비를 지정합니다. | |
| contentHeight | number | 에디터 본문 영역의 초기 너비를 지정합니다. | |
| useInitFocus | boolean | 에디터 초기화 시 본문 영역의 포커스 여부를 지정합니다. | |
| table | width | number | 표의 기본 너비를 지정합니다. |
| tdheight | number | 행의 기본 높이를 지정합니다. | |
| headBorderStyle | string | 표 헤더에 적용할 기본 border style을 지정합니다. | |
| headBackgroundColor | string | 표 헤더에 적용할 기본 background style을 지정합니다. | |
| headColor | string | 표 헤더에 적용할 기본 color style을 지정합니다. | |
| bodyBorderStyle | string | 표 바디에 적용할 기본 border style을 지정합니다. | |
| bodyBackgroundColor | string | 표 바디에 적용할 기본 background style을 지정합니다. | |
| bodyColor | string | 표 바디에 적용할 기본 color style을 지정합니다. | |
| image | host | string | 이미지 파일을 등록할 host 경로를 지정합니다. |
| uploadUrl | string | 이미지 업로드 url 로 host 를 제외한 경로를 지정합니다. | |
| deleteUrl | string | 이미지 삭제 url 로 host 를 제외한 경로를 지정합니다. | |
| src | string | 본문에 추가될 url 로 host 를 제외한 경로를 지정합니다. | |
| allowTypes | array | 허용 가능한 확장자를 지정합니다. | |
| maxCount | number | 등록 가능한 최대 개수를 지정합니다. | |
| maxSize | string | 개별 이미지의 업로드 최대 크기를 지정합니다. | |
| maxTotalSize | string | 전체 이미지의 업로드 최대 크기를 지정합니다. |
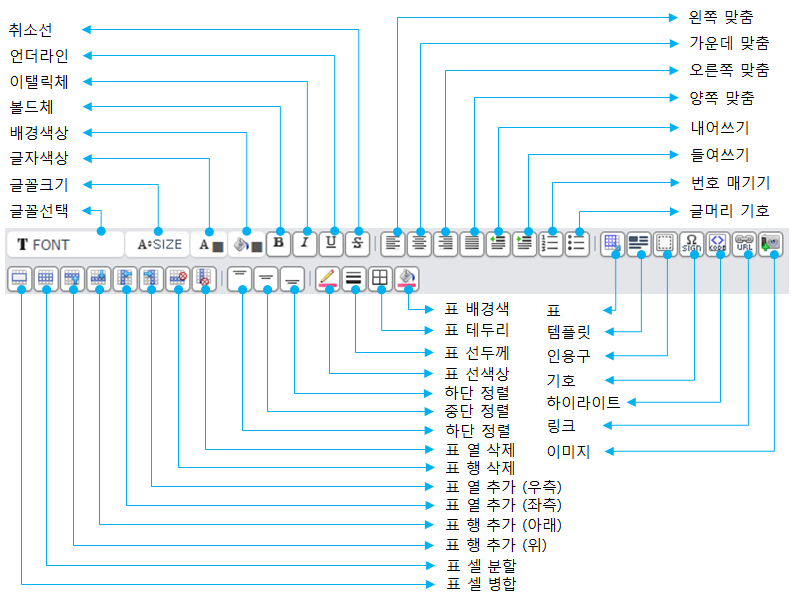
글꼴 | 맞춤 | 삽입 | 표 | ||||
ID | 기능 | ID | 기능 | ID | 기능 | ID | 기능 |
font | 글꼴선택 | left | 왼쪽 맞춤 | layoutTable | 표 | merge | 셀 병합 |
fontsize | 글꼴크기 | center | 가운데 맞춤 | template | 템플릿 | resetMerge | 셀 분할 |
color | 글자색상 | right | 오른쪽 맞춤 | blockquote | 인용구 | insertRowAbove | 위 행 추가 |
bkcolor | 배경색상 | full | 양쪽 맞춤 | specialchar | 기호 | insertRowBelow | 아래 행 추가 |
bold | 볼드체 | indentout | 내어쓰기 | highlight | 하이라이트 | insertColLeft | 좌측 열 추가 |
italic | 이탤릭체 | indentin | 들여쓰기 | link | 링크 | insertColRight | 우측 열 추가 |
underline | 언더라인 | numberlist | 번호 매기기 | linkdel | 링크취소 | deleteRow | 행 삭제 |
strikechar | 취소선 | marklist | 글머리 기호 | image | 이미지 | deleteCol | 열 삭제 |
| verticaltop | 상단 정렬 | ||||||
| verticalmiddle | 중단 정렬 | ||||||
| verticalbottom | 하단 정렬 | ||||||
| tablebdcolor | 선색상 | ||||||
| tablebdheight | 선두께 | ||||||
| tablebdrange | 테두리 | ||||||
| tablebgcolor | 배경색 | ||||||
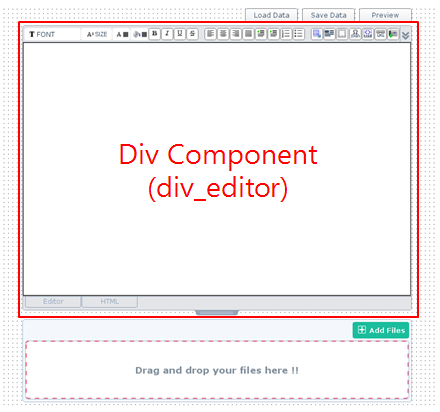
에디터의 setContent 함수를 통해 조회된 데이터(HTML)를 지정하고 setAttachImages 함수를 통해 본문에 등록된 이미지 목록을 표시할 수 있습니다.
3. 데이터 저장
btn_save 컴포넌트의 onclick 이벤트 핸들러에는 실제 데이터를 저장하는 코드는 없으며 첨부파일 저장/삭제 및 에디터 내용을 얻어오는 예시 코드가 작성되어져 있습니다.
에디터의 getContent 함수를 통해 현재 편집중인 내용(HTML)을 얻어올 수 있습니다.
※ 파일 첨부에 관련된 내용은 File 업로드 & 다운로드 샘플 아티클을 참고하세요.
4. 미리보기
btn_preview컴포넌트의 onclick 이벤트 핸들러에는 현재 편집중인 에디터 내용을 미리보는 팝업화면을 호출하는 예시 코드가 작성되어져 있습니다.
에디터의 getContent 함수를 통해 편집중인 에디터의 내용을 얻어온 후 showModal 함수를 통해 미리보기 샘플화면(RichTextEditorPreviewSample.xfdl)을 호출합니다.
미리보기 팝업화면에는 WebBrowser 컴포넌트가 하나 존재하며 Form 의 onload 이벤트 핸들러에서 설정된 preview.html 경로를 연결한 후 로딩이 완료되면 부모창에서 전달 받은 에디터 내용을 표시하게 됩니다.
실행환경 | 증상 |
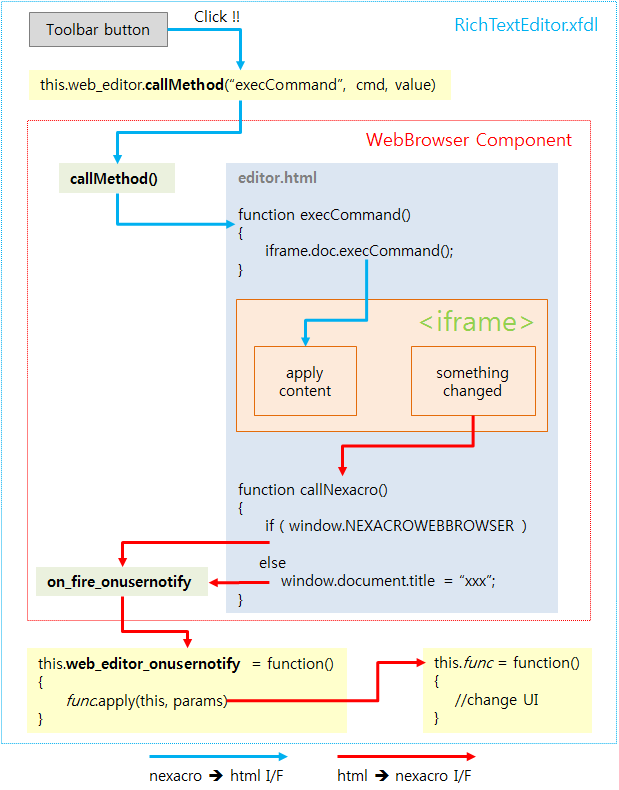
Runtime | WebBrowser 컴포넌트의 onusernotify 이벤트 핸들러에서 화면 페인팅에 관련된 변경이 발생하는 스크립트 실행 시 바로 반영되지 않고 WebBrowser 영역을 벗어나야 반영됩니다. 예를 들어 본문에 이미지를 첨부한 후 이미지를 선택하면 설정창이 팝업되는데 최초 팝업 이후 두번째 선택 시 팝업되지 않고 WebBrowser 영역을 벗어나야 팝업는 현상이 발생합니다. |
Runtime | WebBrowser 컴포넌트에 연결된 HTML 의 텍스트의 잘라내기(Ctrl+X) 와 복사(Ctrl+C) 가 동작하지 않습니다. |